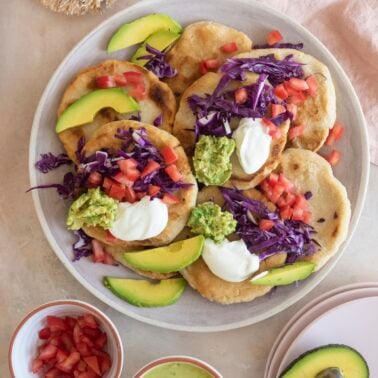
ADD US:
RECIPES E-MAILED DAILY:
SEARCH WEELICIOUS:

Posts Tagged ‘toddler recipes’

Sugar Snap Pea and Asparagus Saute

Wednesday, May 16th, 2012

Two asparagus recipes in one week? The nerve of me! Well, I’m fully prepared to defend myself. Asparagus is in season in most parts of the country right now which means it’s probably grown locally and a lot more fresh than if you bought it in January and it was flown here from who knows how far away. It’s also likely a lot less expensive. When vegetables are in season, use them. A lot. In as many recipes as possible. And listen for which ones your kids love and then seek out new ways to prepare them. My son and daughter are going through a huge asparagus phase right now and you can be pretty sure that if I serve them something with asparagus in it, they’re going to be totally excited to eat it.

And here’s one of my husband’s favorite asparagus tips (no pun intended): to keep your asparagus fresh until you are ready to use them, stand the spears straight up in a tall glass filled with an inch or two of water. Asparagus can lose moisture quickly and dry out and this method will really prolong it’s shelf life so to speak. This time of year you can usually find 3-4 glasses with “asparagus bouquets” in our refrigerator.

This is a simple, fresh side dish that can be ready in 5 minutes or less. If it’s in season, do you need a better reason?!

Sugar Snap Pea and Asparagus Sauté (Serves 4–6)

1 Tbsp Olive Oil
2 Cups Sugar Snap Peas
1 Bunch Asparagus, chopped
½ Teaspoon salt
Zest and juice from 1 small Lemon

1. Heat the olive oil in a skillet over medium-high heat.
2. Add the sugar snap peas and asparagus and sauté until tender, but still crisp, about 3 minutes, stirring occasionally.
3. Sprinkle with the lemon zest and juice, toss to coat, and serve.

Ham and Asparagus Quiche – A Simple Savory Pie

Monday, May 14th, 2012

The day I was testing this recipe a friend of mine came over and began oohing and ahhing about the smell from the moment she walked into the kitchen. I pulled this dish of loveliness from the oven she asked me what it was. “Quiche,” I said. “Quiche? What’s that?” she asked me. How is it possible that she had never heard of quiche? Quiche is just a simple savory pie filled with a variety of fillings — it was almost a staple of my diet growing up in Kentucky. Whenever my mother was having people over for a “fancy” lunch she made it.

This one is filled with the beautiful asparagus I’ve been finding at the farmers’ market and bites of delicious, savory ham. If my friend was confused by what I made, you should have seen how perplexed my kids were when I put a slice of it on each of their plates that night. Neither one could seem to understand why I would put asparagus, ham and cheese in a pie. They actually found it quite funny. However, after tasting just one bite no one was laughing anymore and the sounds of ooh and ahh were heard in my kitchen yet again!

Ham Asparagus Quiche (Serves 6)

4 Large Eggs
3/4 Cup Half and Half
1 Cup Swiss Cheese, shredded
1 Cup Chopped Asparagus
1 Cup Chopped Ham
1/2 Tsp Salt
1 Unbaked Pie Crust* (you can make your own pastry dough or buy prepared crust at the grocery)

1. Preheat oven to 350° F.
2. In a bowl, whisk together the eggs and milk, then stir in the remaining ingredients.
3. Place the dough into a pie or tart pan and mold into the shape of the dish. Place the pie crust in the freezer for 10 minutes to chill.
4. Pour the filling into the well-chilled pie crust, and bake for 50 minutes or until golden and cooked through (the center shouldn’t jiggle).
5. Cool and serve.

*Pie Crust (Makes 1 Deep Dish Pie Crust)

1 1/3 Cups Flour
1/2 Tsp Salt
1/2 Tsp Sugar
1/2 Cup Butter, cubed & cold
2-3 Tbsp Water

1. Place the first 3 ingredients in a food processor and pulse.
2. Add cold butter and using on/off turns, process until coarse meals forms.
3. Add the water 1 tbsp at a time and process until moist clumps form, adding more water 1 tsp at a time if mixture is dry.
4. Form dough into a disk, wrap in parchment paper or plastic wrap and refrigerate 1 hour or until cold.

Strawberry Parfaits for mama’s day

Wednesday, May 9th, 2012

Forward this email to your husband, partner or child right away. O.K., Kenya and Chloe don’t have email — most 5 and 3 year-olds (thankfully) don’t — but you get my drift. You want this recipe in the hands of the people you love. You can leave them notes on their pillows, mention it in casual conversation at the dinner table, write a song about it or, just come right out and fess up to the fact that this is what you really want to have on Mother’s Day morning — something fresh, simple, healthy and tasty…which is also a recipe everyone can make together.

And, it couldn’t be easier, so there should be no excuse from your peanut gallery that they can’t figure it out! If they have the ability to get to the market, take a glass out of the cupboard and layer juicy strawberries, tangy Greek yogurt and crunchy granola, then they can put this spectacular dish together. And if they forget it for breakfast, no worries. Just make sure it ends up being delivered to you in the afternoon (on a tray as you’re lounging on the couch reading a good book) or maybe after dinner while they’re all doing the dishes and you’re chilling out on the side lines!

Doesn’t that just sound lovely, moms? Well, a girl can always dream.

Strawberry Parfait serves 4

1 Cup Wee Granola or your favorite brand
1 Cup Plain Greek Yogurt
1 Cup Sliced Strawberries
Honey to drizzle

1. In your prettiest glass or serving bowl, layer granola, Greek yogurt, A drizzle of honey, and the sliced strawberries. Repeat in that order until you fill your glass or serving bowl, finishing it with a dollop of Greek yogurt, another drizzle of honey, and a small whole strawberry on top.
2. Serve.

Decadent Chocolate Banana Ice Cream Video

Tuesday, May 8th, 2012

Homemade ice cream in minutes? That’s right, in minutes! This decadent Chocolate Banana Ice Cream is simple to make right in your blender, it’s non fat and good for you. Who knew that was even possible?!

Make it with your kids or even by yourself to enjoy at the end of a long day. This is a scrumptious no guilt treat that will make you smile from ear to ear!

Correction: This recipe does contain dairy, but you can substitute soy yogurt for a non-dairy alternative.

Lemon Poppyseed Cookies

Monday, May 7th, 2012

What is it about a frosted cookie that makes kids go gaga? I think I could serve Chloe a mud biscuit and if there was icing on it I guarantee she would eat it. But since I’m not in the habit of serving my kids mud (at least not regularly), I’ve been making these Lemon Poppy Seed Cookies as a special treat. A lot cheaper then the iced cookies sold in the bakery at our local grocery, they’re also made with better ingredients than what you will likely find in the pre-packaged varieties. They’re soft and sweet with tiny pieces of lemon zest and poppy seeds speckled throughout — my kids say they look like tiny spots.

Keep a batch of this dough in the fridge and you can quickly roll it out whenever the kids come home from school and you want to bake them a special treat. Frosted or not, these cookies are beyond delicious (though to be clear, Chloe prefers them with icing!).

Lemon Poppy Seed Cookies (Make 1 dozen large cookies)

2 Cups All Purpose Flour
1 Tsp Baking Powder
1/4 Tsp Salt
1 Tbsp Poppy Seeds
1/2 Cup Butter, softened
3/4 Cup Sugar
1 Egg
1 1/2 Tsp Vanilla
2 Tsp Lemon Zest

Icing:

2 Tsp Lemon Juice
1/3 Cup Powdered Sugar

1. Preheat oven to 350° F.
2. In a bowl, whisk together the flour, baking powder, salt, and poppy seeds.
3. In the bowl of a standing mixer (or using an electric mixer) cream together the butter and sugar for 3 minutes on medium to high speed, or until light and fluffy.
4. Add the egg, vanilla, and lemon zest and beat until just incorporated.
5. Turn the speed to low and slowly add the flour mixture until the dough comes together.
6. Using a lightly floured rolling pin, roll out the dough onto a lightly floured surface until 1/4″ thick and even.
7. Use cookie cutters to cut out desired shapes (I like to start at one end of the dough and make the cuts close together to utilize all of the dough).
8. Using a spatula, transfer the cut-outs onto a Silpat or parchment-lined cookie sheet.
9. Bake for 15 minutes, rotating the tray from back to front halfway through cooking until the edges just turn golden.
10. Cool cookies on a rack.
11. To make the icing, stir together the lemon juice and powdered sugar until smooth and ice the cooled cookies.

Cinco de Mayo Recipes Tip: How to Cut an Avocado Video

Tuesday, May 1st, 2012

Looking for easy Cinco de Mayo recipes? Whether you’re in the mood to make Chicken Fajitas, Chicken and Rice Burritos, Fish Tacos or Pupusas, slices of avocado or guacamole make a rockin’ accompaniment! This tip video will show you how simple it can be to open, slice, pit and cut an avocado and keep that beautiful green color from turning brown!

Out of This World Vegan Chocolate Chip Cookies

Monday, April 30th, 2012

I’ve been shopping at our local farmer’s market for well over a decade. The market is a community onto itself, filled with kindly, familiar faces, some of who have become friends over the years. One of those people is a woman I’ve seen there weekly since I first started going. A true beauty with bright, pink-streaked platinum blonde hair and her baskets overflowing with an array of fruits and vegetables, this woman always looked so effortlessly cool she seemed like someone I could only aspire to be — not to mention I couldn’t begin to imagine how one person could go through that much produce in a week!

Years later I finally met her. I’m not sure if we were introduced or just struck up conversation at one of the stalls, but when she spoke she became even cooler to me (if that is possible). It turned out that she had a name, Jules, and I found out why she always looked like she was buying out the market. Jules told me about her business, Renaissance Mamas, whose mission is to “empower and inspire women to take back the kitchen”. As it turned out, Jules had coincidentally been going into several of my friends’ kitchens to do everything from full makeovers on their cabinets, to teaching and advising them about the food they bought, to educating them how they could best cook for their families. Jules is essentially a magic kitchen fairy. If you hate cooking or know someone who does, just have them spend 5 minutes with Jules and they will be immediately converted.

Recently I saw Jules’ recipe for vegan chocolate chip cookies on her Rennaiasance Mamas blog and had to try them. Being a glutton when it comes to anything made with chocolate I doubled down and made one tiny alteration, chopping big pieces of vegan chocolate to create tiny bits and chunks of chocolate throughout the cookies. As the batch baked I wondered, would they be as buttery and yummy as a regular chocolate chip cookie? Would the kids like them or think think they tasted like cardboard as I think some vegan baked treats can? Well, if the half-empty cookie jar on day one was any indication, I’d say that they’re beyond pretty darn good. What the kids and I didn’t finish, my husband quickly dispatched.

Yet another reason to love my farmer’s market.

Vegan Chocolate Chip Cookies (makes 4 dozen cookies)

1/2 Cup Coconut Oil
1/2 Cup Brown Sugar
1/4 Cup Almond, Soy or Rice Milk
1 Tbsp Vanilla Extract
2 Cups All Purpose Flour
1 Tsp Baking Powder
1 Tsp Baking Soda
1/2 Tsp Salt
1 10-ounce Bag Vegan Chocolate Morsels, chopped

1. Preheat oven to 350° F.
2. In a bowl, whisk together the coconut oil, brown sugar, almond milk, and vanilla.
3. In a separate bowl, whisk together the flour, baking powder, baking soda, and salt.
4. Stir the dry ingredients into the wet ingredients and mix in the vegan chocolate morsels.
5. Using a mini ice cream scooper or one tablespoon measure, scoop out dough onto a Silpat or parchment-lined baking sheet and gently press down to flatten a bit.*
6. Bake for 12 minutes.
7. Cool and serve.

*You can also scoop 1 tablespoon of the cookie dough into mini muffin tins to make cookie bites. Cooking time and temperature remain the same.

From Renaissance Mamas

Circulon Pots & Pans Giveaway

Thursday, April 26th, 2012

I feel like I’m always in need of new pots and pans. Some girls get excited about shoes, I’m a sucker for cookware.

When I came across the Circulon Symmetry line it was kind of like finding the perfect pair of flats that I could wear with anything — sleek, versatile and ideal for any occasion. Circulon pans are completely dishwasher-safe, durable and made from a material that’s twice as strong as stainless steel. Their Total Nonstick Release System is great, especially when you’re trying to cook healthier, since you can use less oil and butter to produce perfectly cooked meals.

Lucky for us, Circulon is generously offering 3 weelicious readers different ways to win. One winner will receive the Circulon Symmetry 11-Piece Set (valued at $300), another will get the Circulon Symmetry Twin Pack of 10″ and 12″ Skillets (valued at $60 )and the third will get the Circulon Symmetry 12″ Covered Essential Pan (valued at $60). For a chance to win, simply tell me what’s your favorite weelicious recipe is — I’d love to know!

Winners will be chosen at random and announced here next week. Good luck!

*Circulon is currently set up to ship to the US only. Therefore, this giveaway is open to US residents only!*

This contest is now closed. Congratulations to the winners!
Lindsay Nasato – Circulon Symmetry 11-Piece Set
Jennifer Emmons – Circulon Symmetry Twin Pack Skillets
Megan Kramar – Circulon Symmetry Essential Pan

Cinnamon Pizza Buns

Monday, April 23rd, 2012

I still vividly remember going to the mall as a kid and being seduced by the incredible smell of hot cinnamon buns coming out of the ovens at Cinnabon. I was totally the child who opted for a big, fat, gooey cinnamon roll over anything else in the food court. Even now when I pass a Cinnabon, I always pause to inhale the spicy wafts of warm cinnamon bread being drowned in creamy icing.

Homemade cinnamon buns, while an enticing thought, are also a ton of work. Although I’ve tried my hand at them several times, some things are just worth buying as a special treat when you’re out and about. Plus, the last thing I need is to have a batch of homemade Cinnabon-style buns testing my willpower every time I walk in the kitchen.

This is my slightly healthier version of a cinnamon bun which uses pizza dough for the bread and whipped cream cheese, honey and a mix of chopped dried fruit for the filling.

For a weekend brunch or special breakfast these are a mouthwatering treat that don’t require a trip to the mall!

Sweet Pizza Rolls (Makes 10 Rolls)

16 Oz White or Whole Wheat Pizza Dough or 1/2 Recipe Whole Wee-eat Pizza Dough
3/4 Cup Whipped Cream Cheese
2 Tbsp Honey
1 Tsp Ground Cinnamon
1 ½ Cups Chopped Dried Fruit (I use raisins, cherries, cranberries and apricots)
Chopped nuts (optional)

1. Preheat oven to 450° F.
2. Roll out pizza dough into a 10 x 20-inch rectangle, about 1/4 inch thick.
3. In a bowl mix the cream cheese, honey and cinnamon.
4. Spread cream cheese mixture in an even layer across surface of dough.
5. Sprinkle with dried fruit (and nuts, if desired).
6. Beginning at the 20-inch side roll up into a cylinder and then cut into 2-inch thick discs (rolls).
7. Place rolls in greased muffins cups or on a greased baking sheet and pat down slightly.
8. Bake for 20 minutes, allow to cool slightly and serve.

Pear Apple Butter

Monday, April 16th, 2012

This is one of the first purees that I made for the kids when they were babies and they both always ate it with sheer delight. Funnily enough, they still love it now. Why buy pre-packaged apple sauce at the grocery when you can quickly make this naturally sweet and healthy version.

The pear and cinnamon make this more than just a puree. Whether you serve it for breakfast, in school lunch or even as a quick snack, this Pear Apple Butter is a good one no matter what your age!

Pear Apple Butter (Makes 6 Servings)

1 Gala, Pink Lady, or Fuji Apple, peeled and cut into 1-inch cubes
1 Ripe D’Anjou or Red Pear, peeled and cut into 1-inch cubes *
1/8 Tsp Ground Cinnamon

1. Place apple in steamer pot over boiling water and cook for 3 minutes.
2. Place apples, pears and cinnamon in food processor and puree until smooth.
3. Serve.

* If pears are firm/hard, you can steam them for 3 minutes with the apples


Enter Your Zip Code to find your local Farmer's Market:

Powered by www.localharvest.org